Thursday, October 23, 2008

you don't need sassy, you need spice cake

you don't need sassy, you need spice cake

Some of the best things, when put to paper, oftentimes just don't sound that spectacular. Spice cake? Really? It just doesn't have the ring of awesomeness. Holy-Mother-Flipping-Totally-Rad-Spice-Cake, maybe. Please do not let the lackluster photo or hum-drum name sway you into not making this cake, because really, you must make this cake. It's good. Real good. With every bite my husband was rendered speechless and when he did muster up words, he rapturously muttered things like "be still my heart"*. When the last piece was eaten, I cried a little inside.

Make it now and thank me later. Oh, and go read about my food & wine autumn roadtrip outside of Vancouver for the Food Network blog.

spice cake
2 c flour
1 t cinnamon
1/4 t ground cloves
1/4 t ground nutmeg
1/4 t ground cardamom
1/4 c ground almonds
1 1/2 t baking soda
1/2 t salt
1 c brown sugar
1/4 c molasses
1 egg
1/2 c oil
1/2 c yogurt
1/2 c milk
1/2 c toasted pecans, chopped
1/2 c raisins

Preheat oven to 350. In a large bowl, combine the flour, spices, ground almonds, baking soda, and salt. Set aside. In another bowl, mix together the brown sugar, molasses, egg and oil until combined. In a measuring cup, mix the milk and yogurt together and set aside.

Add the egg mixture to the flour mixture and gently blend. Add in the milk mixture, along with the pecans and raisins and mix until just combined. Grease and flour a bunt pan and pour in the mixture. Bake until a cake tester comes out clean, 45-55 minutes or so (depending on the size of your cake pan). Cool slightly on rack and then invert cake from pan and let cool completely or eat warm.

* Okay, he did not say "be still my heart", but it sure paints a better picture than "this is good cake" (which I already mentioned anyway, so there).

butternut squash soup with gruyere croutons

butternut squash soup with gruyere croutons

firstly, I can't take credit for this photo. it's by the amazing Deb of Smitten Kitchen - my absolute favorite food blog. I stalk her blog every time I'm making a grocery shopping list and need some new inspiration. I have raved about this recipe on more than one occasion. I could tell you how great it is ,or how I'd really eat it everyday, or how each time I've made it I proclaim, "this soup is amazing", or how it's the best soup I've ever made... but that wouldn't even begin to explain how amazingly good this soup is. the nuttiness of squash combined with the smoky flavor of cumin topped off with the ever amazing earthy, creamy flavor of Gruyère cheese... oooo la la.
it's a rainy, cold day in Portland and I'm dreaming of soup. this soup got me through Winter. so even though most of you are suffering from the heat wave that is covering most of the country, live like it's Fall or Winter and smell the cumin through the computer screen.

Butternut Squash Soup with Gruyere Croutons
adapted from Deb's recipe, originally adapted from Bon Appetite

:: for soup ::
1/4 cup (1/2 stick) butter
1 large onion, finely chopped
4 large garlic cloves, chopped
4 1/2 cups chicken broth
3 lbs butternut squash, peeled and cut into 1 inch pieces
1 1/4 tsp minced fresh thyme
1 1/4 tsp minced fresh sage
2 tsp ground cumin
1 tsp ground ginger
1/8 cup whipping cream

• melt butter in large pot over medium heat. add onion and garlic and saute until tender, about 10 minutes.
• add broth, squash and herbs; bring to boil.
• reduce heat, cover and simmer until squash is very tender, about 30 minutes.
• working in batches, puree soup in blender. return soup to same pot.
• stir in cream; bring to simmer. season with salt and pepper.

can be made 1 day ahead. chill. rewarm over medium heat before serving.

:: for croutons ::
4 cups cubed bread slices
1 cup grated Gruyere cheese
1 tsp minced fresh thyme
1 tsp minced fresh sage
2 tbsp olive oil

• preheat broiler.
• arrange bread cubes on baking sheet.
• drizzle olive oil over top of cubes. toss with hands.
sprinkle cheese, then thyme and sage over bread cubes.
• broil until golden, about 1 minute. re-arrange cubes and broil for about 1 minute more.

• ladle soup into bowls and top with croutons. grate an additional amount of cheese on top if desired.

Black Fettuccine with Shrimp and Butternut Squash

Black and Orange Recipe: Black Fettuccine with Shrimp and Butternut Squash


20081015-halloween-fettuccine.jpg

Black and Orange Recipe: Black Fettuccine with Shrimp and Butternut Squash

- serves 4 to 6 -

Ingredients

1/4 cup of olive oil
2 large shallots, sliced
2 cloves of garlic, sliced
1 teaspoon of herbes de Provence
1 tablespoon of fresh thyme leaves, with optional extra for garnish
1 1/3 pounds of peeled and cubed butternut squash, trimmed to a 1/2-inch dice
1 1/4 cups of dry white wine
2 cups of vegetable broth (1 can)
30 ounces of peeled and deveined shrimp
17.5 ounces of black fettuccine (if your store sells another shape of black pasta, like spaghetti or linguine, go ahead and use it)
4 tablespoons of cold unsalted butter (1/2 stick)
Salt and pepper
Parmagiano Reggiano cheese, grated to taste (optional)

Procedure

1. Heat the oil in a large nonstick pan over medium heat.

2. Place the shallots in the warm oil, and sauté for 5 minutes, until translucent and fragrant.

3. Scatter in the garlic, thyme, and herbes de Provence, and sauté for one minute more.

Halloween!4. Tumble in the cubes of butternut squash, and continue cooking for 8-10 minutes. Season with salt and pepper.

5. Pour in the wine and broth, and increase heat to medium high, allowing the liquid to boil and then simmer for 8-10 minutes, until the squash is tender, and the liquid reduces by about half.

6. With the liquid still simmering, add in the clean shrimp, and make sure they are submerged. They will be just cooked and perfect in five minutes.

7. Meanwhile, boil the squid-ink black fettuccine in a large pot of boiling salted water according to package directions. Be sure to drain it just shy of the listed cooking time, so that it remains al dente.

8. Dice the cold butter into cubes and place into a large bowl. Add the fettuccine and the shrimp and squash mixture to the bowl, and toss.

9. Serve hot, with a scattering of freshly grated Parmagiano Reggiano and extra thyme leaves over the bowls.

Spiced Streusel Apple Pie

I knew you had to have this recipe. I've already made it again since Thanksgiving and it's only been a week!

Spiced Streusel Apple Pie

for streusel
topping:
2/3 cup pecans

1/2 cup (packed) golden brown sugar

1/4 cup granola

1/4 cup all purpose flour

3/4 teaspoon ground cinnamon

1/2 teaspoon ground nutmeg

5 tablespoons chilled unsalted butter, cut into small pieces


for filling:
2 1/4 pounds Granny Smith apples (about 6 medium), peeled, quartered, cored, cut into 1/2-inch-thick wedges
1/2 cup sour cream

1/4 cup sugar

2 tablespoons all purpose flour

1 1/2 teaspoons ground cinnamon

3/4 teaspoon ground nutmeg

1/4 teaspoon ground cloves

1 Flaky Pie Crust
, prepared and chilled

Preparation

For streusel: Combine pecans, brown sugar, granola, flour, cinnamon and nutmeg in processor. Using on/off turns, process until nuts are finely chopped. Add butter and process until small moist clumps form. (Can be prepared 1 day ahead. Cover and refrigerate.)

For filling: Position rack in center of oven and preheat to 375°F. Toss apples with sour cream in large bowl to coat. Mix sugar, flour, cinnamon, nutmeg and cloves in small bowl. Sprinkle mixture over apples and toss to coat.
Transfer filling to prepared crust. Sprinkle streusel over apples, covering completely. Bake pie until apples are tender and streusel is golden, tenting pie with foil if streusel browns too quickly, about 1 hour. Transfer pie to wire rack and cool slightly. Serve pie slightly warm or at room temperature.


Keeping things seasonal, my awesome sister-in-law, Melanie, seduced us all with the other dessert of the night: Pumpkin Bread Pudding with Toffee Sauce.


I swear, we had this bread pudding and the apple pie keeping warm in the oven while we digested our dinner, and when I opened the oven door to take a peek it smelt so good my knees nearly buckled. The combination of apple and pumpkin with all the spices was just too good to be true. If only there was a scented candle that smelled so sweet!

Last fall I created the memorable Pumpkin Spice Bread Pudding with Rummy Raisins and Mel's version only confirmed that I love, love bread pudding. It's a great do-ahead dessert, the flavors only improve over time, and it's actually a brilliant dessert to bring to a pot-luck--nothing is going so squish, spill or crack.
I had suggested we whip some cream to top of both the pie and the pudding, but that was deemed to be 'overdoing it' and the idea was shot down. (I know, I know, who runs the kitchen anyway, right?)
However, it turns out the toffee sauce was really all I needed, and no one noticed that I splashed a little onto my pie as well.

Pumpkin Bread Pudding with Toffee Sauce

Bread:
5 cups cubed day-old bread, (crusts left on or removed)
1/2 cup golden raisins

Custard:
2 large eggs plus 1 large egg yolk
3/4 cup canned pure pumpkin (no spices added)
1 1/2 cups half & half, milk, light cream or a combination thereof
3 tablespoons unsalted butter, melted and cooled
1/2 cup light brown sugar
1/2 teaspoon pure vanilla extract
1/2 teaspoon ground cinnamon
1/4 teaspoon ground ginger
1/8 teaspoon ground cloves
1/4 teaspoon salt

Toffee Sauce:
1/2 cup dark brown sugar
4 tablespoons unsalted butter, cut into pieces
1/4 cup heavy whipping cream
1/4 teaspoon pure vanilla extract

Preheat oven to 350°F and place rack in the center of the oven. You will need an 8 inch square baking dish.

Custard: In a large bowl, whisk together the eggs, pumpkin, half and half, melted butter, sugar, vanilla, spices and salt. Add the bread cubes and raisins and toss to coat, making sure all the bread cubes are coated with the custard.

Transfer the bread pudding to the ungreased pan and bake for about 25 mins or until a toothpick inserted in the center comes out clean. Remove the bread pudding from the oven and place on a wire rack to cool slightly.
Served warm with toffee sauce.

Toffee Sauce:
Place the butter, sugar, and cream in a saucepan and bring to a boil. Boil for about 3 minutes then remove from heat and stir in the vanilla extract. You can make this sauce in advance and simply reheat.

Makes an 8x8 inch bread pudding (serves 6 people)

Blood Orange Sorbet

September 30, 2008

Blood Orange Sorbet

Sorbet-a
How pretty is this? Not only pretty pink but tasty also.

A Thermomix recently found it's way to my kitchen. A little snippet on David Lebovitz and I was off googling Thermomix. A couple of emails, a phone call and suddenly Eva was demonstrating and cooking us lunch on the Thermomix machine.

The Thermomix replaces a myriad of kitchen appliances which is perfect for those of us who have downsized to an apartment with a smaller kitchen and less cupboard space.

You can read all about my new best friend over at the Thermomix site. I'd rather talk about the wonderful Blood Orange Sorbet I made today. This is how quick and easy it is to make sorbet in a Thermomix.

1. Place sugar in bowl and mill for 10 seconds on speed 9
2. Add the fruit followed by 1 tray of ice and egg white. Slowly turn speed dial to 10.
3. Add the remaining ice after 20 seconds and continue on speed 10 for 40 seconds.
4. Serve immediately or place in freezer until ready to serve.

Sorbet-c

If you haven't tried blood orange you must. The taste is very different to a conventional orange.
Sorbet-b

My previous sorbet recipe made the conventional way can be found here.


Pumpkin Praline Tartelettes With Butter Pecan Ice Cream

Pumpkin Praline Tartelettes With Butter Pecan Ice Cream


Today, it actually felt like Fall for the first time. There was a little chill in the air this morning as we left for work, and we actually had to wear a little cardigan this evening while watching the sunset. The kind of weather that makes me very, very happy... I have been impatiently awaiting a good reason to make fall favorites such as pumpkins, cranberries, pomegranates and so forth. It is rather unusual to pop by the neighbors' house on a hot humid day with pumpkin praline pies and have they exclaimed "yeah, we had been craving those!". I tend to bring more fruit filled desserts or frozen ones. However, when I walked up the stairs to the twins' house with a small box of these tartelettes, I knew everybody had fall on their mind and a little place for them. C. opened the box while we were chatting on the steps and before we knew it there was cofffe brewing and the other neighbors chatting things up with us while the kids were already devising their Halloween parade....oh yeah, this year it is a parade!!

I know you have had or/and made countless amounts of pumpkin pies before so why would I was poetic about these? Well, there are the first I make this season and that is something so be tlaked about after month of scorching ht summer days and temperature refusing to drop below 80 degrees at night. It just feels nice to say the words "pumpkin pie". The tartlets were further enhanced by homemade butter pecan ice cream showcasing the first pecans our tree gave us and the delightful Moravian cookies we brought back from Winston - Salem this past weekend. Thanks again Abby for all your suggestions: Sweet Potaotes and their sister restaurant, The Cotton Mill were both great destinations for dinners the Reynolda house and Old Salem were incredible and we threw in the battlefield in Greensboro for good measure!

Back to the tartelettes....all my favorites in a couple of bites: an almond shorbread crust, rich pumpkin and praline filling and a little touch of ice cream because...well...just because homemade ice cream rocks! For the praline, I used this paste I was given by another pastry chef in town, a sales rep. dropped two of and she wanted me to give her my opinion. Being as busy as the next person, I like the convenience of already made pastry "aids" like nut pastes and fruit purees and this particular one did not disappoint. You can also make hazelnut praline (caramelized hazelnuts) and grind it fine and use as such in the following recipe, but you can find good and affordable pastes on the internet nowadays that will your time more efficient in the kitchen. The dough is my go-to nut and butter dough inspired by Dorie Greenspan. Feel free to change the nuts in it, walnuts work as good as (even better in my taste) almonds. It needs to be rolled between sheets of plastic wrap or parchment paper and kept as cold as possible, even when handling. Use your fingertips to pat and patch it if it tears. The filling is inspired by the same Richard Leach I love and admire so much, except that I do not have time this week to follow through with his beautifully designed plated desserts. It was my first try at butter pecan ice cream and it has now become a new favorite. If you don’t have an ice cream maker, you can freeze the custard for a couple of hours, beat it with an electric mixer and refreeze again, repeating the operation 2-3 times, until you get a proper ice cream consistency. Feel free to use your favorite cookies for the ice cream sandwiches (the Moravian cookies I used had a ginger flavor).


Pumpkin Praline Tartelettes with Butter Pecan Ice Cream

Makes 8 4 inch tartelettes

Almond Short Dough:
In a food processor, combine 1 1/4 cups flour, 1/2 cup powdered sugar, 1/4 cup walnuts and 1 stick of butter, pulse until it resembles coarse meal, add 1 egg yolk and pulse until combined into a ball. Flatten the into a disk in between sheets of plastic wrap, refrigerate and roll it out to cut rounds big enough to fit into 8 mini tart pans. The dough gets soft very fast so you can flour your fingertips to push it up and down the sides and bottom of the pan.
Bake at 300 for 10 minutes. Let cool before filling them.

Pumpkin Praline Filling:

1 ½ cups pumpkin puree (I used canned)
¼ cup praline paste
½ cup sugar
1 tsp. cinnamon
½ cup milk
Pinch of salt
¾ cup heavy cream
3 eggs

In a large bowl beat the eggs with the sugar until combines. Combine the pumpkin and praline paste and cinnamon and add to the egg mixture. Slowly whisk in the milk and the cream. Divide evenly among the tart shells and bake at 300 for 20 minutes or until the custard just starts to set. Let cool to room temperature.

Butter Pecan Ice Cream:

Makes 1 quart

2 cups pecans (1/2 lb), chopped ( I like mine coarse)
3 tablespoons unsalted butter, softened
1/4 teaspoon salt
1 cups packed light brown sugar
½ cup granulated sugar
2 teaspoons cornstarch
4 large eggs
2 cups whole milk
2 cups heavy cream
3/4 teaspoon vanilla

Preheat oven to 350°F. Toast pecans in a shallow baking pan in middle of oven for 7 to 8 minutes. Add butter and salt to hot pecans and toss until butter is melted, then cool pecans completely.
Whisk together brown sugar, granulated sugar and cornstarch, then whisk in the eggs until combined. Bring milk and cream just to a boil in a heavy saucepan over medium heat, then add to egg mixture in a stream, whisking constantly, and transfer custard back to the saucepan.
Cook custard over medium low heat heat, stirring constantly with a wooden spoon, until thick enough to coat back of spoon (do not let boil).
Immediately pour custard through a fine-mesh sieve into a bowl and stir in vanilla, then cool, stirring occasionally. Chill custard, its surface covered with wax paper, until cold, at least 3 hours.
Freeze custard in ice cream maker until almost firm. Stir together ice cream and pecans in a bowl, then transfer to an airtight container and put in freezer to harden.
Use your favorite cookies to make small sandwiches and serve along side the pumpkin tartelettes (which I decorated with chopped pecan brittle for their photo shoot)


Happy Halloween!


And yippee today was the day to get one (sugar fix). I have been meaning to post this since this morning but we are having terrible internet connections these days...off/on/off/on...enough to drive you crazy!
These cookies may not look like the ones you will find on the shelves of professional decorators but this is what you get for working with a dinosaur, two knights, a mermaid, a pirate and a zebra...yes, we had a slight chance of costume programming! We took the kids trick or treating on an old golf cart with a trailer attached to the back and they had a great time!

Cut Out Sugar Cookies, adapted from allrecipe site:
3 cups all-purpose flour
1 teaspoon baking soda
1/2 teaspoon baking powder
3/4 cup butter, softened
1 cups white sugar
1 egg
1 teaspoon vanilla extract

Preheat oven to 375 degrees F (190 degrees C). In a small bowl, stir together flour, baking soda, and baking powder. Set aside.
In a large bowl, cream together the butter and sugar until smooth. Beat in egg and vanilla. Gradually blend in the dry ingredients. Refrigerate dough, roll out and cut as desired
Bake 8 to 10 minutes in the preheated oven, or until golden. Let stand on cookie sheet two minutes before removing to cool on wire racks.

Royal Icing, from Joy of Baking site
4 cups (440 grams) confectioners' sugar
3 tablespoons (30 grams) meringue powder
1/2 teaspoon extract (vanilla, lemon, almond)
1/2 - 3/4 cup (120 - 180 ml) warm water

In the bowl of your electric mixer (or with a hand mixer), beat the confectioners' sugar and meringue powder until combined. Add the water and beat on medium to high speed until very glossy and stiff peaks form (5 to 7 minutes). If necessary, to get the right consistency, add more powdered sugar or water. To cover or 'flood' the entire surface of the cookie with icing, the proper consistency is when you lift the beater, the ribbon of icing that falls back into the bowl remains on the surface of the icing for a few seconds before disappearing.
The icing needs to be used immediately or transferred to an airtight container as royal icing hardens when exposed to air. Cover with plastic wrap when not in use.
Makes about 3 cups

Sometimes it's good to just bake with the kids and be one again!


Pumpkin Seed Brittle and Burnt Sugar Ice Cream

Yes, Halloween is here. It is kind of a new holiday for me and even after 10 years of being here, I still enjoy playing dress up and waiting for little goblins and witches to knock on my door. You can see the excitement in the kids' eyes as they prepare their costumes and have them laid out on the bed, ready for their big day. You can sense that pre-sugar rush as they get ready to go trick or treating. Seems like we are going to have a small Halloween block party with sugar, chocolate and a hay ride around the neighborhood.
After SHF, I spent most of the weekend baking and decorating Halloween cookies and I can say that after many dozens of pumpkins, ghosts, bats and cats that I have no desire of becoming a cookie decorator. The novelty wore out after the first 2 dozens. My fingers are covered in orange, black and green food coloring. I believe I have more sugar sparkles in my hair than Dolly Parton has sequin on her dress, but that is for another post!

No Halloween would be complete without carving a pumpkin. Problem is, I got one much more for getting the flesh and seeds than for the carving itself so my design remained minimal. I only had one thought in mind: I wanted to make pumpkin seed brittle as I thought it would make a nice edible garnish to a warm slice of Apple Cinnamon Cake. My mind kept on going and I thought that ice cream would be great with it too, but not necessarily vanilla. I was browsing through Dorie Greenspan's Baking: From My Home To Yours, when I found this incredible ice cream recipe. It is smooth and creamy, caramely but not too sweet. It was good enough to eat on its own but incredible combine with the cake and the brittle.

Burnt Sugar Ice Cream, adapted from Dorie Greenspan:

1 cup sugar
3 b. water
2 cups whole milk
1 cup heavy cream
4 egg yolks
pinch of salt
1 1/2 tsp. vanilla extract

Stir the sugar and water in a saucepan and cook over medium heat until the sugar dissolves. Increase the heat and cook until it becomes a caramel of deep amber color. Lower the heat and add the milk and cream. It will bubble like mad but continue stirring until it is smooth, remove from the heat.
In a large bowl, whip the egg yolks and salt until a little thick, slowly pour the hot milk mixture over it and whisk to tamper the yolks. Put back into the saucepan and cook until it coats the back of a spoon (creme anglaise consistency or 170 degrees F).
Let cool completely and churn into your ice cream maker. Freeze for 2 hours or moreor until firm to scoop....if you can wait that long!


Pumpkin Seed Brittle, from Martha Stewart

1/4 cup (1/2 stick) unsalted butter, plus more for baking sheet
1/2 cup packed light-brown sugar
1/4 cup honey
1 cup fresh pumpkin seeds, rinsed well, dried, and toasted

Preheat oven to 350°. Butter an 11-by-17- inch rimmed baking sheet; set aside.
Melt butter in a small saucepan over medium heat. Stir in sugar and honey. Bring to a boil. Cook, without stirring, until mixture is medium amber and a candy thermometer registers 280°, about 6 minutes. Stir in pumpkin seeds. Cook until mixture reaches 300°, about 2 minutes. Pour onto prepared baking sheet. Let cool completely. Break into pieces.


Zebra And Tiger Cakes: The Other Side of Bananas


I realized the other day that it had been a while since my last few, weekly banana posts, especially so when B. (that's the hubby) handed me the fruit bowl with that heavy sigh : "please, do something, put an end to their misery, pleeeeeeze". I had to go teach a couple of classes so I put the dear bananas in the back of my mind.
Later in the afternoon, we were outside with the rest of the neighborhood, and the kids (ages 3 to 9) were vividly talking about their Halloween costumes. Looks like we are going to have a fairy, a princess, a baby pumpkin, a skeleton, a couple of ghosts, a zebra and a tiger. We are trying to come up with a couple of games that could keep them entertained for a while as well as some fun foods that adults and kids can enjoy. That's when the bananas came to haunt me... I remembered a marbled banana cake I had seen on the Cooking Light website when I was looking for the Apple Cinnamon Cake from the other day.

I made it and baked them in mini bunt shapes. As soon as I took some next door, the kids exclaimed : "oh look! They look like Zebras! They look like Tigers" and that's how this marbled cake got a new name, at least around Halloween.

Marbled Chocolate Banana Bread, aka Zebra and Tiger Cakes, adapted from Cooking Light:

2 cups all-purpose flour
3/4 teaspoon baking soda
1/2 teaspoon salt
1 cup sugar
1/4 cup butter, softened
1 1/2 cups mashed ripe banana (about 3 bananas)
2 eggs
1/3 cup plain low-fat yogurt
1/2 cup semisweet chocolate chips

Preheat oven to 350°.
Lightly spoon flour into dry measuring cups, and level with a knife. Combine the flour, baking soda, and salt, stirring with a whisk.
Place sugar and butter in a large bowl; beat with a mixer at medium speed until well blended (about 1 minute). Add banana, egg substitute, and yogurt; beat until blended. Add flour mixture; beat at low speed just until moist.
Place chocolate chips in a medium microwave-safe bowl, and microwave at HIGH 1 minute or until almost melted, stirring until smooth. Cool slightly. Add 1 cup batter to chocolate, stirring until well combined. Spoon chocolate batter alternately with plain batter into an 8 1/2 x 4 1/2-inch loaf pan coated with cooking spray or mini bundt pans. Swirl batters together using a knife. Bake at 350° for 1 hour and 15 minutes or until a wooden pick inserted in center comes out clean. Cool 10 minutes in pan on a wire rack; remove from pan. Cool completely on wire rack.

Since using smaller pans, they baked a little faster, more like 30-40 minutes, depending on your oven.
They were great with some vanilla ice cream.

Lemon Raspberry Mille Feuilles

Lemon Raspberry Mille Feuilles

I know, I know, it is Fall...so why all the raspberries? And now the lemon? Store diplays, magazine covers and tv shows "fall season" premieres are doing a great job at convincing me it is Fall. Yet, one step outside in the middle of the afternoon keeps telling me otherwise, time and time again. Still wearing flip flops and shorts so I hope you will indulge me for a couple more raspberry posts. I promise the next one will have an autumnal twist.

We are enjoying quite a few dinners outside with the neighbors and the summer grill outs have finally given way to wonderful oyster roasts. It is hard to believe the way our street functions but if you spend one week here it'd be easy to see why I wish I could take the whole street with me if we ever move. It is not uncommon to harbor someone else's dog while they help you run after your own, have about 3 strollers and 8 dogs walking alongside your own crazy little-big ones. A walk up to the dock usually turns into a crabbing or shrimping fest while 2 of the above mentionned dogs decide to go for a swim without giving you notice first.

These are the moments that my soul swell with life and good feelings, the ones that make you wish your arms were big enough to grab a hold of it all. So you let your heart do it. You let all the wonderful strangers in. There will be moves and departures, goodbyes and boxes of macarons dropped at the doorstep of new neigbors. Just let them in...because they never ask why and what.

Our little nucleus likes to gather on the front steps of C&H and the twins. It is much easier to monitor the pets, the kids and we literally can throw a head of lettuce in direction of the picnic table if someone forgot the greens. I have not tossed anything like cakes and desserts, although the twins are polishing their receivers' skills for that very purpose. This past weekend we celebrated A's first time without training wheels, AJ's first three teeth (all or nothing kind of baby!), a tiny peaceful newborn, a kittie and a new neighbor. Somebody rented the house next to ours for the next few months and C. and I started to joke around that she might run away scared after one weekend spent around here. Loud. Busy. Open doors. Skateboards. Loud. Treehouse. S'mores. Frisbees. Did I say loud? I was feeling bad for this poor lady but I remembered the phrase "baptism by fire"...

Saturday night, the steamer started going full blast, we dragged the long narrow table upfront and set out buckets, oyster knives, crackers, wine, cocktails, etc... The kids really wanted to meet this new neighbor and were wondering if she might ever come out and say hi. I laughed and said "don't worry, she will...and fast I bet. If she comes down fast and smiling that means she is hungry and wants to meet you. If it is fast and fuming, run!!!" Within 20 minutes, L. was among us, glass of wine in one hand and my dog licking her other hand clean.

Lemon Raspberry Mille Feuilles

I am just in charge of desserts here. C. has a talent for making a yard or a driveway feel like the front steps of a magical kingdom. She laid down a huge and almost brand new rug she had found on the side of the street a couple days prior, a couple of newly painted red lawn chairs picked up from an army depot store and the kids were watching movies projected on a oversized curtain on the side of the house while the adults were seriously entertaining.

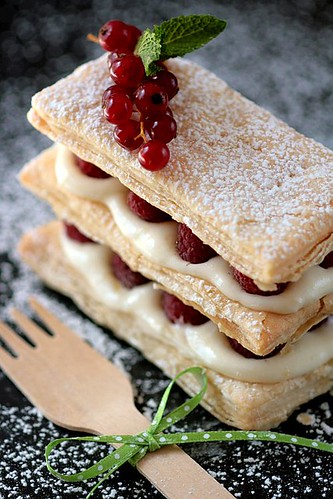
Since the mood was light and the temperatures still in the upper 80s, I decided to bring a summer-ish dessert to our picnic table. The children love to eat what the Pretending-To-Be-Grownups eat, preferably without plates or utensils, and the messier the better. While we delicately forked into our Lemon and Raspberry Mille Feuilles, sometimes separating layer for more of that flaky effect, they exercised perfect gluttony by eating these in two bites, flat. Good thing they were light and not too tangy and that I had made twice the amount necessary!

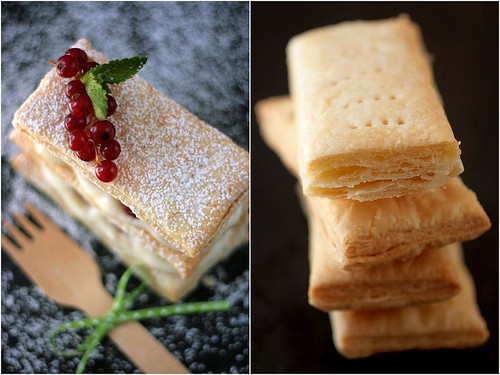
Light is the word. Mille Feuilles takes its name from the numerous layers puff pastry and although the traditional one, well, the one I grew up on, is filled with vanilla custard and topped with chocolate fondant, once you get the hang of it, the possibilities are endless. Puff pastry is not that difficult to do. No really, I am not just saying that. It requires patience and time, so yes, it best left for a day you are around the house doing other things. Make sure your kitchen is not blistering hot and that you let the dough rest the require amount of time in between each turn. Not only is it crucial to relax it but it also prevents the butter from turning to mush and running out of your dough while you roll.

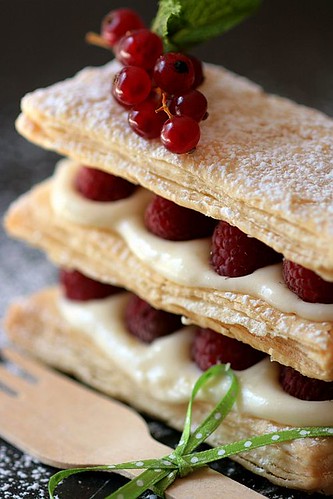
What you see in the pictures is a quick puff pastry I have been working on and I am really excited of the way it turned out, but I can't give you the recipe quite yet. I will however re-direct you to another one I absolutely love, from Martha Stewart. Works like a charm and make the most tender, flaky dough, and if you have to learn one basic, well hers is a great start. Each layer is filled with a lemon curd mousse and topped with rows of raspberries. Again, feel free to change the fruit as any would work great with lemon. There is plenty of chocolate coming up with the holidays so a little lemon-berry slice is a welcome lighter sight (that is if you forget all the butter in the dough!)

Lemon Raspberry Mille Feuilles

Lemon Raspberry Mille Feuilles:

Makes 6-8 depending on the size of your rectangles.

Kitchen Note: the dough makes more than you need but double wrap it in plastic film and freeze for a later use. You won't regret it.

For the puff pastry:
Makes about 2 1/2 pounds.
3 cups all-purpose flour, plus more for work surface (420 gr)
3/4 cup cake flour (105 gr)
1 1/2 teaspoons salt (7 gr)
4 tablespoons unsalted butter, cut into 1/2-inch pieces, well chilled (60 gr)
1 1/4 cups cold water (295.5 ml)
1 tablespoon all-purpose flour (14 gr)
1 3/4 cups (3 1/2 sticks) unsalted butter, well-chilled (405 gr)

- Make the dough package: In a large mixing bowl, combine both flours with the salt. Scatter butter pieces over the flour mixture; using your fingers or a pastry cutter, mix in the butter until it resembles coarse meal.
-Form a well in center and pour in the water. Using your hands, gradually draw flour mixture over the water, covering and gathering until mixture is well blended and begins to come together. Gently knead mixture in the bowl just until it comes together to form a dough, about 15 seconds. Pat dough into a ball, and turn out onto a piece of plastic wrap. Wrap tightly, and refrigerate 1 hour.
- Make the butter package: sprinkle 1/2 tablespoon flour on a sheet of parchment paper. Place uncut sticks of butter on top, and sprinkle with remaining 1/2 tablespoon flour. Top with another sheet of paper; using a rolling pin, pound butter to soften and flatten to about 1/2 inch. Remove top sheet of paper, and fold butter package in half onto itself. Replace top sheet of paper, and pound again until butter is about 1 inch thick. Repeat process two or three times, or until butter becomes quite pliable. Using your hands, shape butter package into a 6-inch square. Wrap well in plastic wrap, and place in refrigerator until it is chilled but not hardened, no more than 10 minutes.
-Assemble and roll the dough: Remove dough package from refrigerator, and place on a lightly floured work surface. Roll dough into a 9-inch square. Remove butter package from refrigerator, and place it in the center of the dough square. Fold each corner of dough square over the butter package so that it is completely enclosed. Press with your hands to seal.
- Using the rolling pin, press down on the dough at regular intervals, repeating and covering the entire surface area, until it is about 1 inch thick. Gently roll out the dough into a large rectangle, about 9 by 20 inches, with one of the short sides closest to you. Be careful not to press too hard around the edges, and keep the corners even as you roll. Brush off any excess flour. Starting at the near end, fold the rectangle in thirds as you would a business letter. This completes the first single turn. Wrap in plastic wrap and refrigerate 45 to 60 minutes.
- Remove dough from refrigerator, and repeat the rolling and folding process, giving it five more single turns. Always start with the flap opening on the right as if it were a book. Mark the dough with your finger each time you complete a turn to help you keep track. Chill 1 hour between each turn. After the sixth and final turn, wrap dough in plastic wrap; refrigerate at least 4 hours or overnight before using.
-Divide the dough in half, double wrap one half with a sheet of parchment paper and plastic wrap and freeze for a later use. The dough can be frozen up to three months.
-Roll one half to a 1/8 inch (3 mm) thick 18x10 or so rectangle and cut out 4x2 rectangles and place them on a parchment paper lined baking sheet. Dock the dough with a fork to let the steam out while baking so your rectangles will be evenly puffed. Bake at 350F until golden brown. Let cool completely before filling with the mousse.

For the lemon mousse:
grated zest of 1 lemon
1 cup (250 ml) lemon juice
1/2 cup (100gr)sugar
2 eggs
1 cup (250 ml)heavy cream
2 pints fresh rapsberries (about 2 cups)

Combine the zest, sugar, juice in a saucepan, and bring to a simmer. In a small bowl, beat the eggs until light. Beat some of the lemon mixture into the eggs to temper. Scrape the mixture back into the saucepan and cook stirring constantly until it thickens up, about 5 minutes. Strain and let it cool to room temperature, covered with plastic wrap until ready to use.
In a stand mixer, whip the cream to medium stiff peaks. Incorporate the cooled lemon curd in three additions. Place in a piping bag and pipe (or spoon) onto the puff pastry rectangles. Top with raspberries and repeat to obtain two or three sheet stacks.


Red Berry Almond Milk Panna Cottas


I need to start with an apology...or two. First, as you can tell my blog posting schedule has slowed down to 2 posts a week instead of every other day. Hmmm...wonder why?!!! I really wanted to thank you for keeping on reading and checking back, especially right now that I have noticed some stressed induced grey hair. Ok, only two..but still! Second, I wanted to apologize for being such a ghost commenter on your blogs. I sometimes have to pack a whole week's worth in one evening so do not worry if it seems like I am stalking your blogs on Friday night....whole pages at a time. In that regard, I wanted to thank you for coming here and leaving comments, you have no idea how supportive I find them, especially at midnight when I am tweaking a recipe for the third time and recalculating metrics one more time.. just to be safe. So peeps....from the deep dark corners of my kitchen, thank you!

It is funny how things happen in series. Right after I posted the Daring Bakers challenge on gluten free crackers and vegan dips, a close friend of ours told us that he had been diagnosed with an allergy to dairy. While not an immediate concern since we do not live together, it became one fast since we had just invited them over for dinner. My initial thought was to look closely at the menu and remove all dairy from it until he called and asked if I could help him come up with dairy free options of his favorite foods. Absolument! Avec plaisir! Yes, it would be my pleasure!


Red Berry Almond Milk Panna Cottas

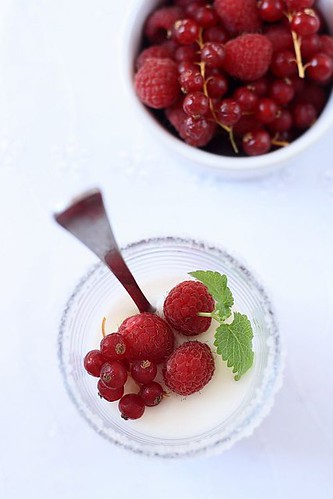
One of his favorite desserts is panna cottas, this delectable Italian concoction of cream, sugar and milk and precisely what he thought he would have to give up on this new eating regimen. I reassured him that there were tons of dairy free milks and creams available nowadays that it would not be difficult to satisfy his sweet tooth. He had just bought a carton of soy milk that tasted just like cardboard and he was starting to have serious doubt he'd find something he'd like. I reassured him that he had probably picked up the only cardboard tasting one in the bunch and pushed him to persevere and try rice milk, oat milk, hazelnut milk and my personal favorite, almond milk.

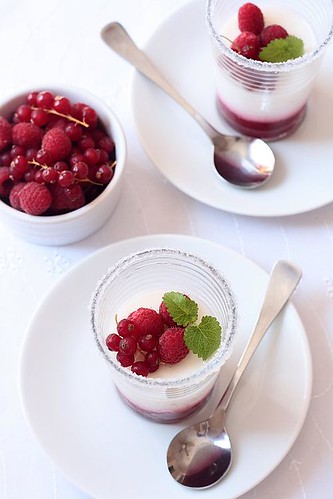
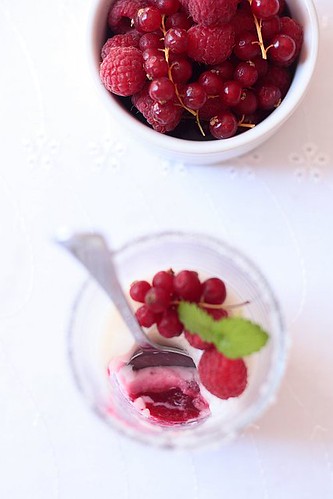
I actually think he gave me an easy one to tweak first. There are so many ways to approach panna cottas: milk, cream, yogurt, buttermilk, sour cream, creme fraiche, fromage blanc. All can be used in making this dessert. I like yogurt based ones a lot but I have a fondness for rich "creamy cream" ones, so does our friend. Problem with almond milk is that it tends to be on the thin side consistency wise so I added some dairy free creamer to the base, like I would in my usual recipe (whole milk and cream). I was a little concerned that the overall taste would be to his liking so I came up with a little diversion just in case: a little raspberry and redcurrant pureed at the bottom of the glasses.

The end result could have fooled the best dairy lover out there (hmmm that might be me!) and the almond milk added a little extra nutty flavor that was perfect with the berries. No grittiness, no cardboard after taste, no "fake" taste lingering after that last bite. Feel free to substitute your favorite dairy free milk and cream as well as fruits to go along. On the other hand if you'd rather stick to regular dairy full panna cottas, click here to get some ideas.


Red Berry Almond Milk Panna Cottas

Red Berry Almond Milk Panna Cottas:

Serves 4-6 depending on the size of your glasses or ramequins

Kitchen Notes:
1/ When you pour the liquid over the fruit, you will notice that the fruit and liquid mass have a tendency to get a little mixed and some of your fruit starts to float in the milk. One way to remedy that is to freeze the glasses once they are filled with the fruit puree while you prepare the panna cotta. Make sure the liquid is at room temperature before pouring it into the glasses or you will shatter your glass.
2/ I used Almond Breeze milk.


1 cup raspberries
1 cup red currant
1 cup almond milk
1 cup dairy free creamer
1/2 cup sugar
2 teaspoons powdered gelatin bloomed in 2 Tb water (means to pour the water over the gelatin and let it sit while you prepare the panna cotta)

In a food processor, puree the raspberries and redcurrant together and divide the mixture among 4-6 glasses. Freeze (see Kitchen Note).

Combine all the ingredients, except the gelatin, in a saucepan over medium high heat and bring to a boil. Heat the gelatin in the microwave for 8 seconds and quickly stir it in the cream mixture. No microwave at our house so I set the cup with the gelatin in large saucepan with enough water to come up halfway up the sides of the gelatin bowl, on medium heat and let the gelatin melt that way. Let the panna cotta mixture cool to lukewarm. Remove the glasses from the freezer and slowly pour the cream over the red berry puree and let set in the refrigerator for at least 3 hours. Decorate with fresh berries if desired.
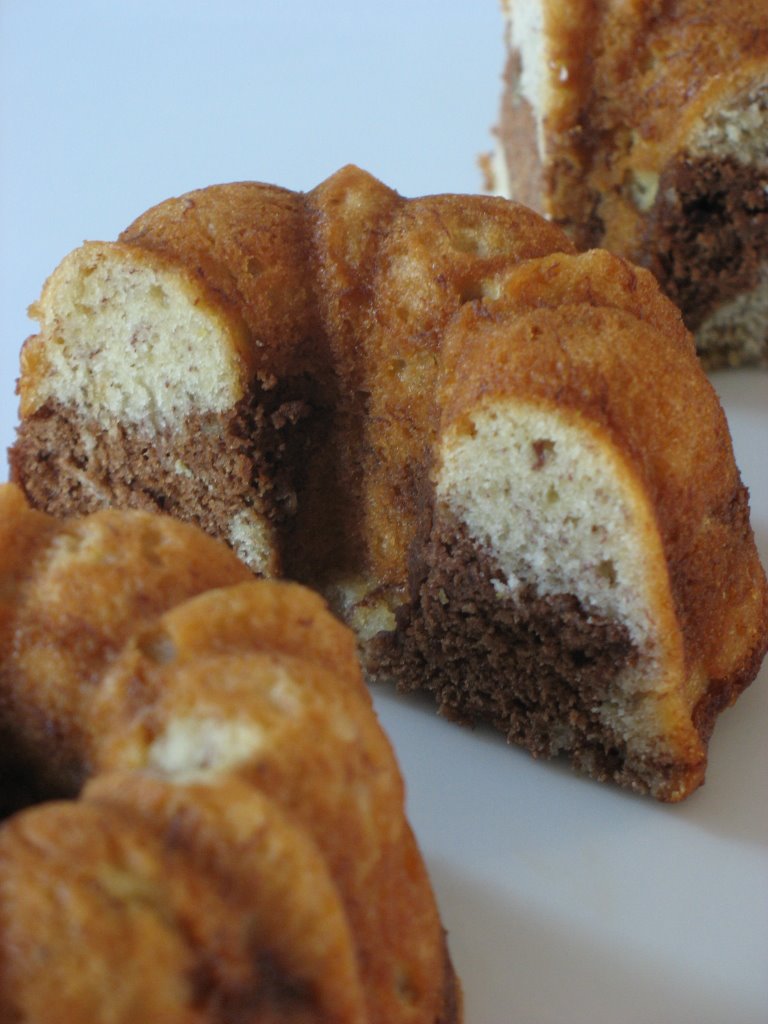
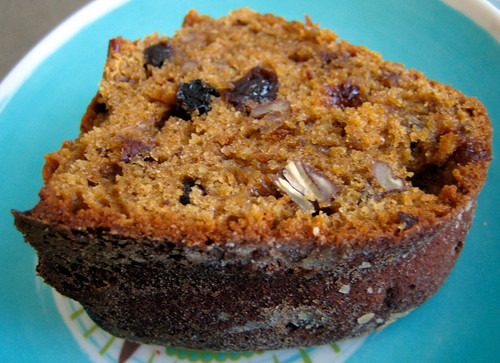
TARTLETTE